Waves and Reflection
Overview
The objective of this project is to become familiar with:
- Reflection of waves
- Continue to work in the same groups
Project
- Overview of how to do the project:
- You will need one file for this project
- For the project
- You will measure resonant modes in two acoustic transmission lines
- Find two tubes of approx. 1.5 inch diameter and preferable one longer than 24 inches (lengths should differ by at least 25%)
- For best results, try to avoid tubes shorter than 10 inches
- Paste the following code into a maatlab script file ( .m file) and run it
- See below for further instructions
%%%%%%%%%%%%%%%%%%%%%%%%%%%%%%%%%%%%%%%%
% first, connect your bluetooth speaker and a microphone (an ear phone mic will work)
% then, paste this into a maatlab script file ( .m file) and run it
%
% audioSweep test
%
%copyright 2020 by Thomas P. Weldon
% all rights reserved
%
% outputs a sinusoidal sweep to a speaker
% reads microphone input
% displays signal on oscilloscope along with a voltage=frequncy/1000
% works best using the microphone on earphones at test location
%
clear all
close all hidden
clc
minFreq=150 % begin freq sweep ~20% below mode n=1
maxFreq=8*minFreq % this is likely high enough for you to see modes n=1,2,3
fstep=minFreq/20;
tfreq=0.05 % time spent at each freq
amplitude=0.2 % sine out amplitude
scopetimewidth=30 % scope width seconds
sampleRate=44100; % audio sample rate
%microphone input
deviceReader = audioDeviceReader;
micdevices = getAudioDevices(deviceReader)
deviceReader=audioDeviceReader(sampleRate,'Device','Built-in Microphone')
deviceReader.Device='Built-in Microphone'; %
deviceReader.SampleRate=sampleRate;
deviceReader.SamplesPerFrame=1024*2;
deviceWriter = audioDeviceWriter;
spkrdevices = getAudioDevices(deviceWriter)
deviceWriter.Device='S111 BT'; % bluetooth speaker purchased for this course
%deviceWriter.Device='Default';
%deviceWriter.Device='Built-in Output';
deviceWriter.SampleRate=deviceReader.SampleRate;
deviceWriter.ChannelMappingSource='Property';
deviceWriter.ChannelMapping=1;
samplesPerFrame = deviceReader.SamplesPerFrame;
sineSource = audioOscillator( ...
'Frequency', minFreq, ...
'Amplitude', amplitude, ...
'SignalType', 'sine', ...
'SampleRate', deviceWriter.SampleRate, ...
'SamplesPerFrame', deviceReader.SamplesPerFrame);
scope = dsp.TimeScope( ...
'NumInputPorts',1, ...
'LayoutDimensions',[2,1], ...
'SampleRate',deviceReader.SampleRate, ...
'TimeSpan',scopetimewidth, ...
'BufferLength',deviceReader.SampleRate*scopetimewidth, ...
'YLimits',[-0.1,0.1], ...
'TimeSpanOverrunAction',"Scroll");
scope.NumInputPorts=2;
scope.YLimits=[-0.1,0.1];
sineFreq = sineSource.Frequency
sineSource.Frequency = sineFreq;
tic
while toc<3
x = sineSource(); deviceWriter(x);
signal = deviceReader();scope(signal.*0,sineFreq/1000)
end
scope.reset
tic
while toc<1
x = sineSource(); deviceWriter(x);
signal = deviceReader();scope(signal.*0,sineFreq/1000)
end
while true
%sineFreq = 1.025*sineFreq ; % could use exponential sweep
sineFreq = sineFreq +fstep ;
disp(['frequency=' num2str(sineFreq) ] )
if sineFreq > maxFreq
break
end
sineSource.Frequency = sineFreq;
tic
while toc<tfreq
x = sineSource(); deviceWriter(x);
signal = deviceReader();
scope(signal,sineFreq/1000)
%scopout=sineFreq/1000
end
%pause(1)
end
release(deviceReader)
release(deviceWriter)
- To begin this experiment:
- Connect your bluetooth speaker (see course syllabus for model number and vendor)
- Plug a set of earphones with microphone into your computer
- make sure that the bluetooth speaker and earphone mic are the
defautl sound output and input of your computer (use your computer
settings)
- load the maatlab script above
- Run the script, and you should hear an audio sweep tone, and and oscilloscope trace should pop up
- If you receive an S11BT error, your bluetoot speaker was not found:
- instead try the "deviceWriter.Device='Default';" line that is commented out in the code
- Place a tube with both ends open betwen the speaker and microphone as shown below
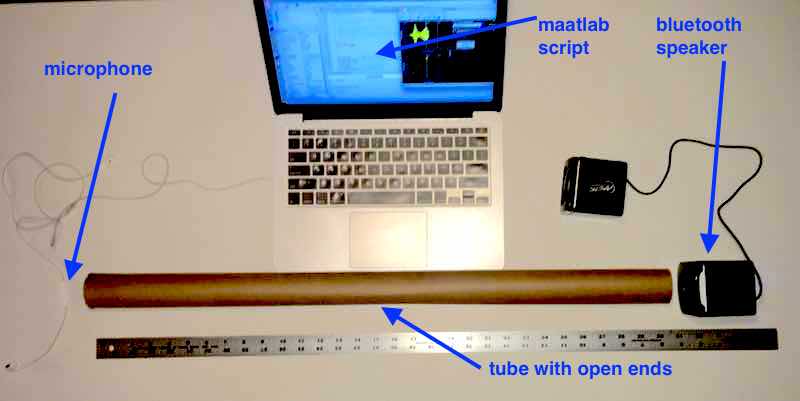
Fig. 01
- For best results,
- use a tube with diameter of approx 1.5 inches andlength greater than 24 inches
- cover the microphone and speaker with towels or pillows to redice noise as shown below

Fig. 02
- Run the maatlab script, and you should see peaks at the modes of the transmission line as shown below
- press the rescale button (magenta arrow in left picture below)
- After the trace is rescaled, it will appear as the picture on the right below
- the modes of the acoustic transmission line with both ends open will appear as peaks
- the second trace equals the frequency/1000, and is next used to find the frequencies of the peaks
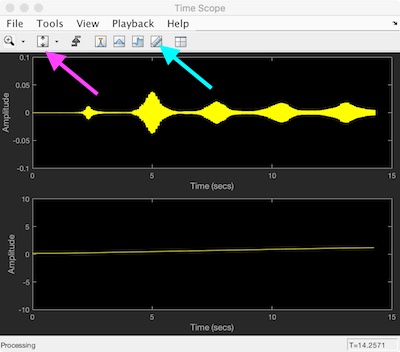
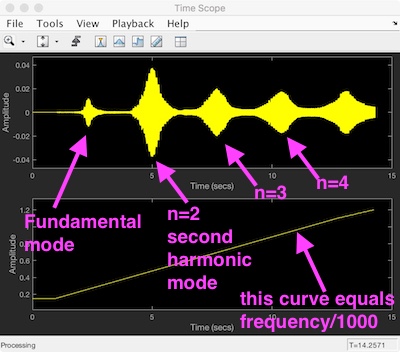
Fig. 03
- Use the cursor (cyan arrow above) to measure the mode frequencies, by finding the peaks as shown below (cyan arrows below)
- Make sure to select the lower trace channel 2 (magenta circle below) to read out frequency/1000 (magenta arrow below)
- Save a picture of each measurement of each peak for your report, and record the first 3 frequencies (n=1, 2, 3)
- In the example below, the first resonance is the n=1 fundamental mode, and 0.5762 volts would correspond to 576.2 Hz

Fig. 04
- Repeat the measurement for the n=2 mode at the second peak as illustrated below
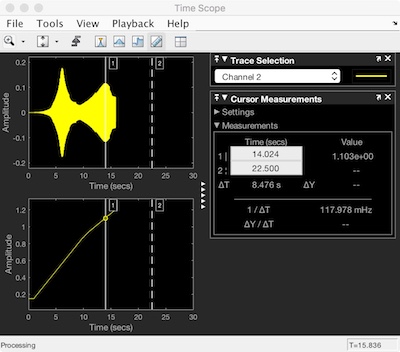
Fig. 05
-
Repeat the experiment with a second tube of different length (lengths should differ by at least 25%)
-
PROJECT REPORT
- For your report:
- First, USE THIS TEMPLATE.
- Make any needed changes including:
- Formula for fundamental mode
- 3 figures
- fill in all values in the table
- Saveyour word file
- Then export-as-pdf
- DO A FINAL CHECK of your pdf before turning it in.
- Submit your report
- DONT FORGET TO SAVE YOUR FILES!
Copyright 2020 T. Weldon
MATHCAD is a trademark of
PTC INC. MATLAB and Simulink are registered trademarks of The Math
Works, Inc. All other product or service
names are the property of their respective owners.