Project 4: Advanced Computer Graphics: Building models using MED
Reference for this project:
Chapter 4 (Link to page of draft book
chapter.)
Preliminary Sketch of Model
- Before starting the software, make a rough sketch of the model
that you would like to create. It is most important to sketch the
three-dimensional details rather than the coloring or detaiils.
Roughly set the proportions of the head, torso, legs, and arms in the
sketch. Try to demarcate important joints such as the wrist,
shoulder, neck, waist, hip, knee, and ankle. It will be important
to have extra polygons at these joints to allow for deformation in
animations. Also, try to keep the ehight of the model around 100
quants.
- A sample sketch is below:
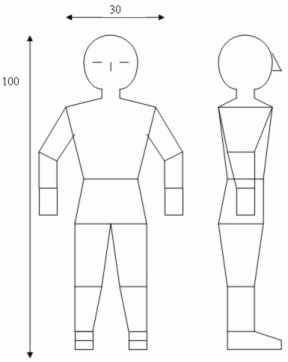 Figure
1. Rough sketch of model.
Figure
1. Rough sketch of model.
Running the Model Editor MED
- Make a directory ~/video/project4 in your home directory
- Run the model editor MED from the MOSAIC menu:
- 3dGamestudio->ModelEditor
- From the menu bar just place a cube as shown below using:
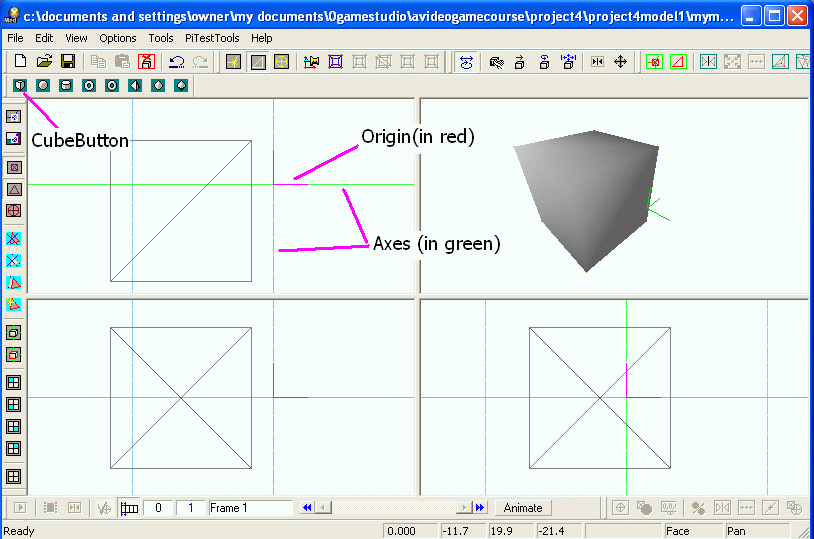 Figure 2. Just a cube placed.
- Save the file at this point (otherwise the next step may not work)
- File->Save ~/video/project3/game3/myModel1.mdl
- For now it is probably safest to keep default preference settings
in MED. At some later time, you may wish to experiment with
different preference settings. It may be convenient in editing to
set 2D grid lines
using MenuBar::File::Preferences with
VideoOut set to DrawOrigin, 2DGrid, GridAutoSize, GridLow=4,
GridHigh=8. The 3D
view is more easily seen without a grid.
- If the 3D view is too dark, right-click the 3D View,
select GXLProperties, and adjust the Default Sun and Ambient
- Next, press the
MenuBar::PositionButton, and zoom in
on the cube.
- Press the MenuBar::SelectButton to
select the
cube with the mouse, and press the MenuBar::MoveButton to center the
cube on
the origin.
- Finally,
press the
SideBar::FitAllButton to readjust all views.
- Then, use the mouse and coordinate
readouts on the BottomBar of the MED
window to see that the cube extends +/- 16 quants from the origin on
all three
axes.
- The shading of the 3D view can be
set with MenuBar::View::3DView::FlatShaded, or whatever shading is
preferred.
Model Design:
- Follow the steps outlined in chapter 4 to design the model from
scratch.
- Begin with a single cube as outlined in the chapter, and extrude
the cube.
- It would be wise to save backups as you proceed (i.e.,
myModel1bak1.mdl, myModel1bak2.mdl, etc.)
- After extrusion, deform the shapes to look like your
sketch.
- When you are satisfied that your half-body is finished, delete
the faces along the line of ymmetry. Your half-body should look
like the figure below when it is ready to be welded. Optionally,
your half-body may include the head and neck.
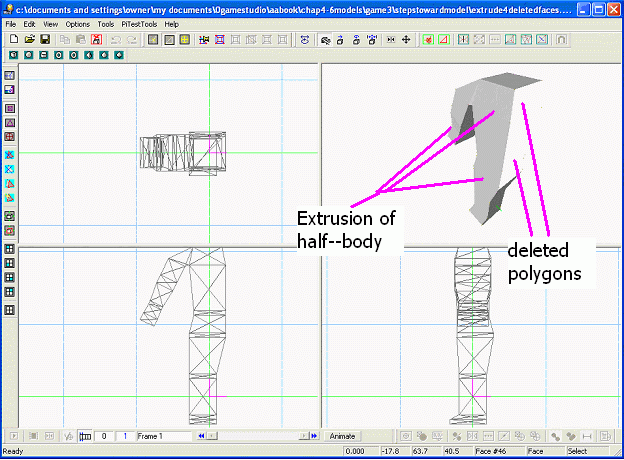 Figure 3. Extruded and half-body
with polygons deleted and prepared for welding.
Figure 3. Extruded and half-body
with polygons deleted and prepared for welding.
- Save a backup of the extrusion as shown in the above figure
before welding. Save this
in a specially named file so that you can open it at a later time when
a picture of this is required for your final report!
- Copy and mirror the half-body.
- Make sure that the normals ar pointing out for the original and
mirror-image half-bodies before any welding. Some versions may
not have the showNormals command, but may have
View::3Dview::DrwaBackfaces
- Position the two halves 2 quants apart, and weld the model
together.
- Extrude shoulders and neck. It should look like the figure
below (perhaps with a head if you chose to include it.)
Figure
4. 3D view of body with neck.
- Attach a head following the procedures of chapter 4, if a head
was not already extruded.
- Rotate the model so that it is in the proper orientation and
facing in the correct direction.
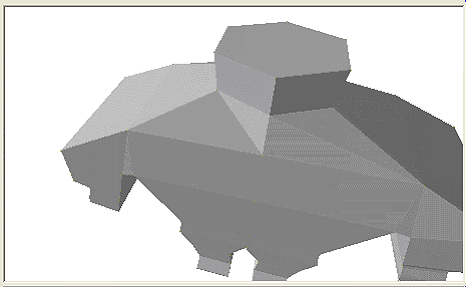
- The final model should look like the figure below:
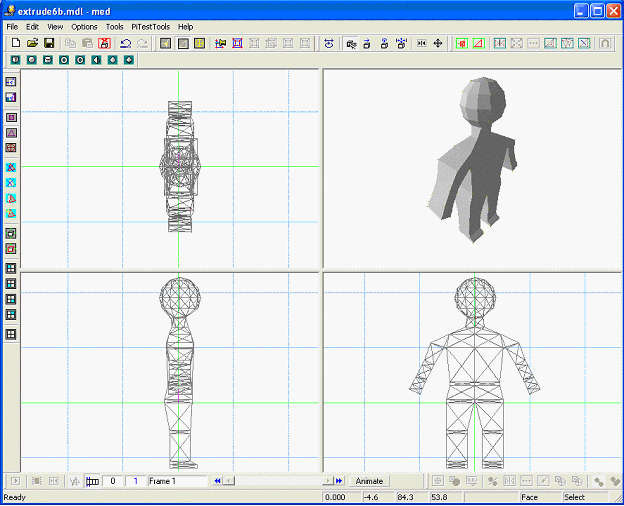 Figure 5. Final model in correct
orientation facing proper direction.
Figure 5. Final model in correct
orientation facing proper direction.
- When you have your final model:
- Run
MenuBar::Tool::MeshTester, and record and report:
- Q1 The 3 numbers
given: AllMeshes, Opened, Closed.
- Run
MenuBar::View::ModelProperties, and record and report the folowing for
your
model
- Q2 Number of
vertices
- Q3 Number of faces
- Q4 Number of frames
- Start all over and create a simple model that consists of a
single cube.
- Run MenuBar::File::ModelProperties, and record and report the
following:
- Q5 Number of
vertices
- Q6 Number of faces
- Q7 Number of
frames
- Q8 How many
faces and vertices are on a cube?
- Q9 How many
triangles comprise each side of a cube?
- Q10 How many
triangles comprise a cube?
Testing the model in a game:
- Make a copy of the game (containing the three cubes of increasing
size) from the previous project in your project 3 directory.
- Copy your new model into the game directory.
- Add your new model to the project near the cubes using
MenuBar::Object::LoadEntity, and place your new model near the player
and near the 3 cubes as shown below.
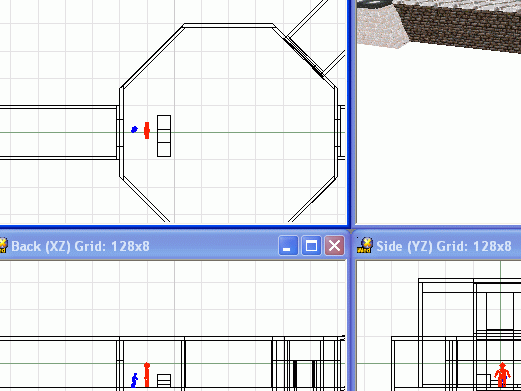 Figure 6. Model in placed in
level for testing.
Figure 6. Model in placed in
level for testing.
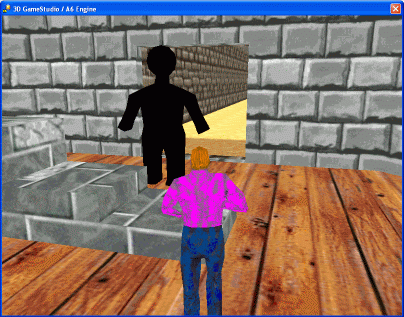
- Build and test the level.
- Because the model is not yet completed, you will only see a
silhouete of the model as shown below.
- Save the game in your project 3 directory.
Figure
7. Model in game appears as a silhouette.
Report and demonstration:
- Prepare a 9-page report exactly in the following format;
- Cover sheet with names
- 1 Page summary of project
- 1 Page sketch showing the original model design sketch, as
in Figure 1 above.
- 1 Page Printout from MED of the extruded half-model in all 4
views showing the deleted polygons before welding, as
in Figure 3 above.
- 1 Page Printout from MED showing the final model in all 4
views, as
in Figure 5 above.
- 1 Page Printout from the running game showing the view looking
at the new model and including the three cubes, as
in Figure 7 above.
- 1 Page Short answers to the following questions:
- Q1 above
- Q2 above
- Q3 above
- Q4 above
- Q5 above
- Q6 above
- Q7 above
- Q8 above
- Q9 above
- Q10 above
- Demonstration
- Show your final model
- Show your game
Copyright © 2005-2007 by Thomas Paul
Weldon
ACKNEX,
WED, MED, and 3D GameStudio are trademarks of Conitec Corporation.
Microsoft, DOS, MS-Dos, Windows, DirectX,
Halo, and
Direct3D are trademarks of Microsoft, Inc.
PAC-MAN trademarks or registered trademarks of Namco Limited
Nintendo, Mario, are trademarks of Nintendo
Atari, Pong, are trademarks of Atari
Intel, 8086, are trademarks of Intel Corporation
id, DOOM, and Quake are trademarks or registered trademarks of Id
Software, Inc.
Autodesk, 3D Studio, and 3ds Max are trademarks or registered
trademarks of Autodesk, Inc.
Alias and Maya are trademarks or registered trademarks of Alias Systems
Corp.