World's Fastest
NetBeans 5.5 Beta 2 Tutorial
T. Weldon, 2006
Warning: beta releases
can be a bit buggy and may crash, so backup your projects frequently
to save your work.
To create a new project:
- NetBeans > File > New Project.
- CategoriesPane: GeneralNode and ProjectsPane: JavaApplication.
Click Next.
- Enter your project's name ("ecgr6118a") in the ProjectName
field and enter the project's parent directory location (it will
create a subdirectory named "ecgr6118a" in the parent
directory).
- Uncheck CreateMainClass checkbox, and check the
SetAsMainProject checkbox.
- Click Finish.
NetBeans should have then created the "ecgr6118a"
directory on your system in the parent directory location.
This directory contains all project's files, including
its Ant script, directories for storing sources and tests, and
a directory for project-specific metadata. To view the project
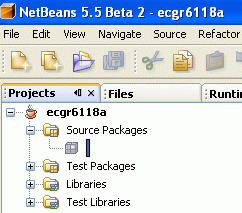
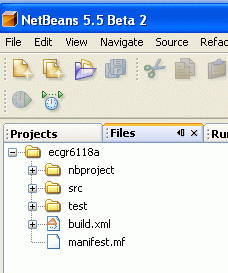
hierarchy, use NetBeans' Projects window. To view the
directory hierarchy, use NetBeans' Files window. Both
views are shown below..
Above:
Projects
view on left, files view on right. Use tabs to selet each
view.
To create a GUI (Graphical User Interface) for your
project:
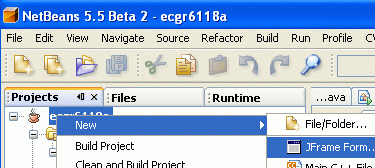
- In the ProjectsPane,
ProjectsPane>right-click-on-ecgr6118a>New>JFrameForm as
illustrated in the figure below
- Enter "Ecgr6118aUI" as the Class Name and
"xyz.ecgr6118a" as the package, where "xyz" is your initials.
- Finish.
Above:
on
left is the view during step 1, on right is view after finishing
steps 1 to 3.
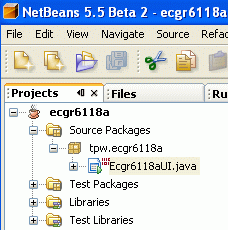
In the right side of the above
figure, NetBeans has created the tpw.ecgr6118a package containing
the Ecgr6118aUI.java JFrame (top level window frame of the graphic
interface) In addition, NetBeans opens up the Ecgr6118aUI JFrame
in GUI Builder as shown below.
Above:
Ecgr6118aUI
opened
in the GUI builder.
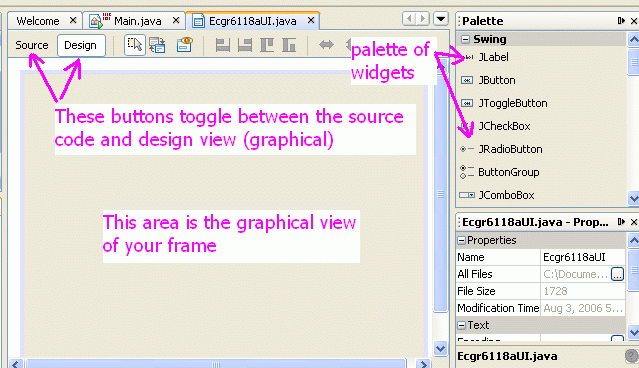
Experiment by clicking the "Design"
and "Source" buttons over the GUI builder to toggle between the
source code view and graphical view of the Ecgr6118aUI graphical
user interface.
Adding widgets (components) to the GUI :
In the Palette, select a JPanel widget
(more properly called a component), by clicking Palette>JPanel,
and placing and resizing the panel on the frame as illustrated
below. Experiment with the border area as shown below (click
the tab to the right of "border" and select a beveled
border). When the mouse selects different areas of the
interface, notice the changes in the palette areas.
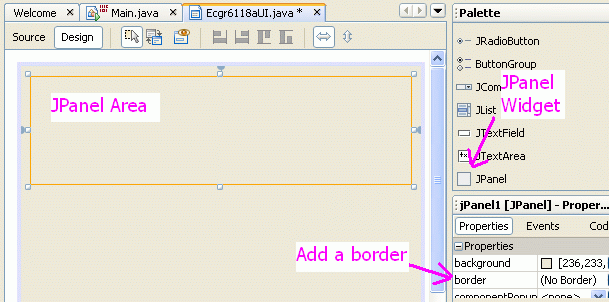
Above:
JPanel
added to GUI .
To preview your GUI design, click the "Design Preview" icon:  .
.
Next, add JLabel, JtextField, and
JButton widgets to the JPanel area, and change their default
values (JLabel1, JTextfield1, and JButton1) to the values shown
below.

Above:
widgets
added in JPanel .
Then right-click each widget, access
the properties window, click on the "code" button in the
properties window, and edit the variable name for each
widget to a more meaningful name such as
JLabelFilename, JTextfieldFilename, and JButtonFilename as
illustrated below for JLabel.
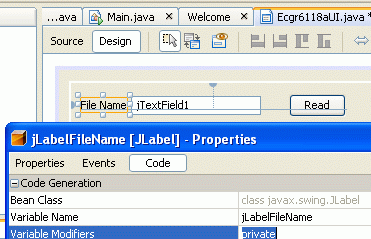
Above:
changing
the variable name of the JLabel widget .
To preview your GUI design, click
the "Design Preview" icon:
.
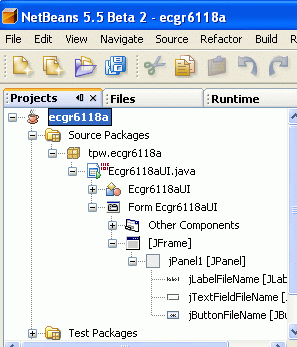
Also, look in the ProjectPane to see the full hierarchy of your
GUI with the renamed widgets JLabelFilename, JTextfieldFilename,
and JButtonFilename as shown below:
Above:
ProjectPane
hierarchy showing renamed widgets JLabelFilename,
JTextfieldFilename, and JButtonFilename .
At this point try to build the project using the build command
from the NetBeans main menu bar:
NetBeans>Build>CleanAndBuildMainProject. At the bottom
of the NetBeans window in the OutputPane, you should see the
message "BUILD SUCCESSFUL."
Then, try to run the project the run
command from the NetBeans main menu bar: Run>RunMainProject,
and the project window should appear similar to the example below.
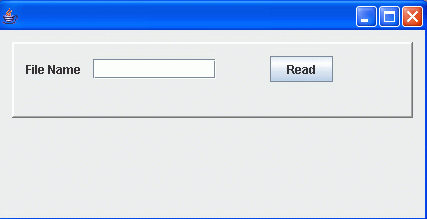
Above:
Running
project window.
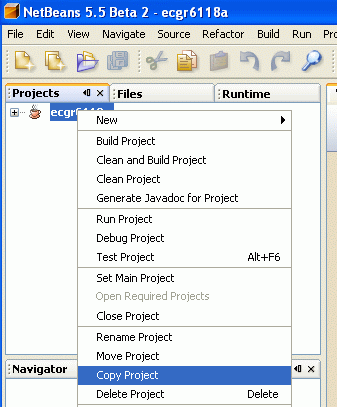
Saving backup copies of your project:
Now would be a good time to save a
backup copy of your work. This is easily done in the
ProjectPane. Make sure the ProjectsTab is selected so that
the ProjectPane is visible in NetBeans. Then, right-click
your top-level project (Ecgr6118a) in the ProjectPane, and
select CopyProject as shown below. The default name of
the backup copy, Ecgr6118a_1, should appear.
Above:
making
a backup with CopyProject.
Adding actions to widgets (Event
Handlers) :
So far, our window has a button, but
nothing happens when the button is pressed. To make
something happen, we need to add an event handler. To do
this, right-click the read button and select
Events>Mouse>MouseClicked, as shown below.
Above:
Adding
mouseClicked eevnt handler to read button.
Once the event handler is added, the source code editor should
appear with a blank function named
"jButtonFileNameMouseClicked" and a "TODO" comment where you
are to add your code. For our example, we will do seevral
things. First, we will add code to pop-up a new window that
contains the filename that was typed into the parent window.
Second, we will print an informational line to the standard system
output area (bottom of NetBeans). Finally, we will print a
message "Button Pressed!" to the text area of the parent window,
where the fileame originally appeared.
To do this, first edit the function as follows:
private void
jButtonFileNameMouseClicked(java.awt.event.MouseEvent evt)
{
// TODO add your
handling code here:
//Create a new pop-up
window.
JFrame frame = new
JFrame("HelloWorldSwing");
frame.setDefaultCloseOperation(JFrame.HIDE_ON_CLOSE);
//read filename and
print it in pop-up window
String filename;
filename =
jTextFieldFileName.getText();
JLabel label = new
JLabel("File Name = " + filename);
frame.getContentPane().add(label);
//Display the window.
frame.pack();
frame.setVisible(true);
//print out a line
System.out.println("jButtonFileNameMouseClicked");
//in the original
window, print a message in the filename area
jTextFieldFileName.setText("Button
Pressed!");
}
You must also go to the top of the
source code file Ecgr6118aUI.java, and add the line "import
javax.swing.*;" right after the line "package xyz.ecgr6118a;" to
add the needed swing library components. Without adding this
line, you should get the error "cannot find symbol, class
JFrame." When you have added this, the top of your
Ecgr6118aUI.java file should have:
package tpw.ecgr6118a;
import javax.swing.*;
Rebuild and run the project.
Type "zzz.txt" in the textfield for the file name, then press the
read button. The output should appear as follows:
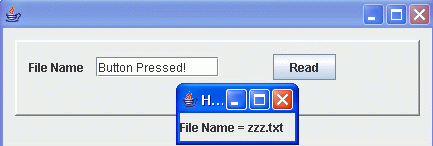
Above:
output
after pressing read button.
The output pane at the bottom of
netbeans should also show the printed output line
"jButtonFileNameMouseClicked" as shown below. This line
was printed from the command
"System.out.println("jButtonFileNameMouseClicked");" added
above.
init:
deps-jar:
compile:
run:
jButtonFileNameMouseClicked
Adding scrollable graphics:
Next, we will add a simple drawing
area and draw an oval. First, add a new JPanel for the
drawing area below our old JPanel. Set the border property
of the panel to TitledBorder, with Title=DrawingArea. For the new
panel, also right-click to edit properties, click the code button
in the properties editor, and change the variable name of the
panel from JPanel1 to "JPanelDrawingArea." Then, add a
JScrollPane to the new JPanel, filling up almost all of the
panel. (Note, by sizing the JScrollPane to occupy nearly all
of the DrawingPanel, this affects the behavior of the scrolling
when the window is resized. If the JScrollPane is much
smaller than the enclosing JPanel, then the scrolling area will
not resize itself when the window resizes.) Similarly, rename the
JScrollPane Right-click>Properties>Code>VariableName and
rename it "JScrollPaneDrawingArea." The final design should
appear as below (also note the class hierarchy in the project pane
and navigator pane).
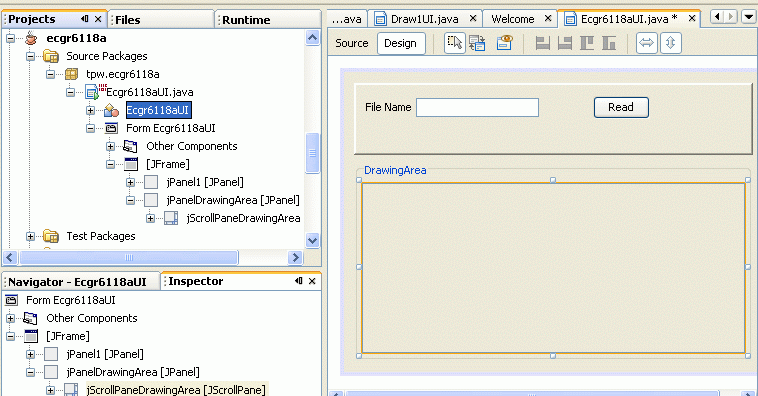
Above:
JScrollPane
added inside JPanel drawing area.
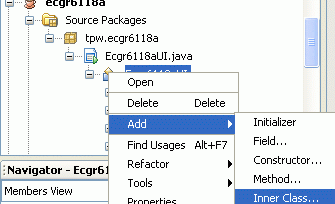
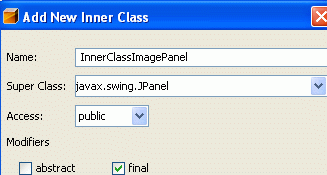
Next, we need to manually add another panel that will be actual
drawing that will be scrolled by the JScrollPane. To add
this new
class, right click the properties window class icon Ecgr6118aUI
and PropertiesPane>RightClick>Add>InnerClass as shown on
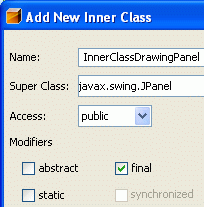
the left below. Name the class "InnerClassDrawingPanel" with
SuperClass javax.swing.JPanel as shown on the right below.
Above:
InnerClass
"InnerClassDrawingPanel added insideEcgr6118aUI .
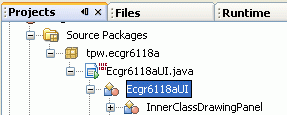
When you have added the new class, the hieracrchy in the
ProjectPane should look like:
Above: InnerClass in hierarchy .
Now add "import java.awt.*;" to the top of your Ecgr6118aUI.java
source code to allow us to access the Graphics class in Java, and
insert the following code so that your new class
InnerClassDrawingPanel definition becomes:
//at the top of your code, you should have the
following imports
package tpw.ecgr6118a;
import javax.swing.*;
import java.awt.*; //needed for Graphics class inclusion
//edit your new class as
follows
public final class InnerClassDrawingPanel extends
javax.swing.JPanel {
protected
void paintComponent(Graphics g) {
super.paintComponent(g);
g.setColor( ovalColor
);
g.fillOval(oval.x,oval.y,oval.width,oval.height);
drawpanel.setAutoscrolls(true);
}
}
The above painting function for our new InnerClassDrawingPanel
draws one oval at coordinates set by variable "oval" and with
color "ovalcolor." So, we need to add
these variables to the Ecgr6118aUI class for our drawing.
Double click the Ecgr6118aUI >Fields>JButtonFileName item in
the projects pane, and the auto-generated variables source code
should appear in the source-code pane. Do not modifiy the
auto-generated variables! Manually add new variables above this
area as shown below:
//begin our
manually added variables
private
InnerClassDrawingPanel drawpanel;
private Dimension area;
private Rectangle
oval;
private Color ovalColor;
//end our manually added variables
// Variables declaration - do not
modify
private javax.swing.JButton jButtonFileName;
private javax.swing.JLabel jLabelFileName;
private javax.swing.JPanel jPanel1;
private javax.swing.JPanel jPanelDrawingArea;
private javax.swing.JScrollPane
jScrollPaneDrawingArea;
private javax.swing.JTextField
jTextFieldFileName;
// End of variables declaration
The new variables must be initialized when the program runs, so
edit the Ecgr6118aUI() constructor function as follows:
/** Creates new
form Ecgr6118aUI */
public Ecgr6118aUI() {
initComponents();
//set up default
drawing
oval = new
Rectangle(20,30,10,20); //topleft-x,y-ccord, wid, height
ovalColor = new
Color(0,0,0);
area = new
Dimension(400,200); //(width,height)
//Set up the drawing
area.
drawpanel = new
InnerClassDrawingPanel();
jScrollPaneDrawingArea.setViewportView(drawpanel);
drawpanel.setBackground(Color.white);
drawpanel.setPreferredSize(area);
drawpanel.revalidate();
drawpanel.repaint();
drawpanel.setAutoscrolls(true); //allows dragging?
}
Add a new button "Draw" to the old JPanel area, name it
JButtonDrawMouseClick and add the event for mouseClick and call it
JButtonDrawMouseClick. The project design should look like:
Above:
Draw
button added .
Next, edit the source code for the event handler as follows:
private void
JButtonDrawMouseClick(java.awt.event.MouseEvent evt)
{
// TODO add your handling code here:
ovalColor=Color.RED;
drawpanel.setBackground(Color.YELLOW);
jScrollPaneDrawingArea.setBackground(Color.BLUE);
drawpanel.setForeground(ovalColor);
oval.setBounds(60,
30, 20, 10);
area.setSize(500,200); //width,height
}
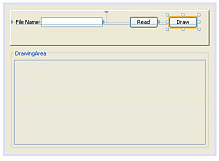
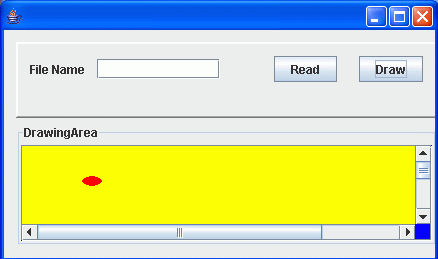
Finally, clean and rebuild the project, then run the
project. The initail window when run should appear as below:
Above:
initial
window appearance when project is run .
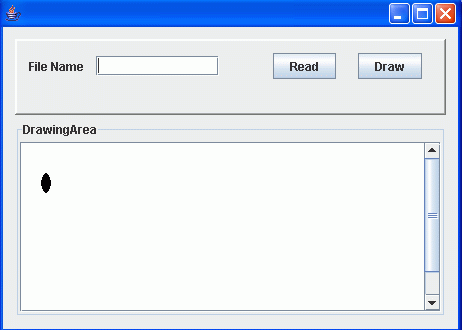
After clicking the Draw button and resuizing the window until the
scroll bars appear, the window should change to the format shown
below.
Above:
window
appearance after Draw button is pressed, and after resizing
window several times
.
Adding scrollable image-file
graphics, reading/writing image files, and reading/writing pixels:
Next, we will add another scrollable
panel where we can display image files. In this, we will
make use of the javax.imageio library for the ImageIO class, the
java.awt.image library for the BufferedImage class, and the
java.io for the File class. Create a new JPanel with
BorderTilte "ImageArea" and Naamed jPanelImageArea. Add a
JScrollPane to the new JPanel, named jScrollPaneImageArea (size
the scroll pane to nearly fill the panel, so window resizing will
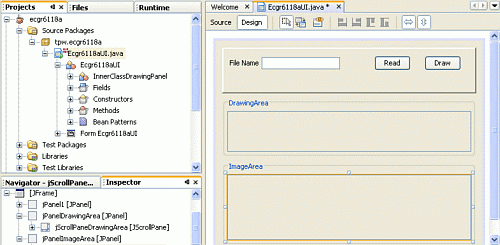
work correctly). This new design is shown below.
Above:
window
appearance after new ImageArea is added .
Next, manually add the following variables for the new image
area. Double click the Ecgr6118aUI
>Fields>JButtonFileName item in the projects pane, and the
auto-generated variables source code area of your Ecgr6118a.java
should appear in the source-code pane. Do not modifiy the
auto-generated variables! Manually add new variables above this
area as shown below.
//begin our second set of
manually added variables
private InnerClassImagePanel imagepanel;
private String imgFileName;
private ImageIO imgIo;
private BufferedImage buffImg;
private File imgFile;
private JLabel iconLabel;
private ImageIcon imageIcon;
//end
our second set manually added variables
// Variables declaration - do not
modify
Then add the following import
statemets, as necessary, to the top of your Ecgr6118a.java source
code:
package xyz.ecgr6118a;
import javax.swing.*;
import java.awt.*; //needed for Graphics class inclusion
import javax.imageio.*; //needed for ImageIO
import java.awt.image.*; //needed for BufferedImage
import java.io.*; //needed for File
Next, we need to manually add another panel that will be actual
drawing that will be scrolled by the ImageArea JScrollPane.
To add this new class as before, right click the properties window
class icon Ecgr6118aUI and
PropertiesPane>RightClick>Add>InnerClass as shown on the
left below. Name the class "InnerClassImagePanel" with
SuperClass javax.swing.JPanel as shown on the right below.
 Above: adding inner class for
image area, InnerClassImagePanel.
Above: adding inner class for
image area, InnerClassImagePanel.
Now insert the following code so that your new class
InnerClassImagePanel definition becomes:
//edit your new class as
follows
public final class InnerClassImagePanel extends
javax.swing.JPanel {
protected void paintComponent(Graphics g) {
super.paintComponent(g);
/*
//following not used .. may be helpful for debug
drawpanel.revalidate();
drawpanel.repaint();
*/
drawpanel.setAutoscrolls(true);
//allows dragging?
}
}
The above painting function for our new InnerClassImagePanel
simply draws the existing graphics context "g," and so we next
need to add the functionality needed to load an image into this
graphics context. To load an image, we will take advantage
of the built-in functionality of JLabels to display image
icons. An image file will first be read into a BufferedImage
object using an ImageIO object to access the file. The
BufferedImage will then be converted to an Icon which is then
displayed through a JLabel object.
Next, add thefollowing initialization code to the public
Ecgr6118aUI() constructor, below the Ecgr6118aUI()
code added previously to initialize the drawingpanel for drawing
the ovals in the drawing area.
//below added for image panel area
//---------------------------------------------------------
//initialize
variables to null to hopefully suppress rendering
imgFileName
= null;
imgIo
= null;
buffImg
= null;
imgFile
= null;
iconLabel
= null;
imageIcon
= null;
//Set up the drawing
area.
imagepanel
= new InnerClassImagePanel();
jScrollPaneImageArea.setViewportView(imagepanel);
iconLabel
= new JLabel(); //this label will contain the image
imagepanel.add(iconLabel);
//attach the label to the drawing panel
imagepanel.revalidate();
imagepanel.repaint();
imagepanel.setAutoscrolls(true);
//allows dragging?
//end added for image panel
area
//---------------------------------------------------------
Finally, we will make better use of the read button that was
previously added, and use the existing read button to read our
image file. However, first downlad the following test images
in
imgs.zip or as a tar-file
imgs.tar (you might have to press
shift or ctrl key on your browser to download), and save them in
the directory of your project, ecgr6118a. These will be used
as the test image files. The directory structure of
theproject should be as shown below:
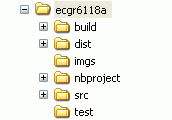
Above: image directory "imgs" added to project.
Edit the read-button function "jButtonFileNameMouseClicked" that
was created previously, and add the code as follows (deleting the
previous code in the function):
private void
jButtonFileNameMouseClicked(java.awt.event.MouseEvent evt) {
// TODO add your handling code here:
//BufferedImage and
ImageIO method
imgFileName =
jTextFieldFileName.getText();
jTextFieldFileName.setText("Read Button
Pressed!");
imgFileName=new
String("imgs/image512x512.gif");
imgFile = new
File(imgFileName);
int ioflag = 0;
try { buffImg =
imgIo.read(imgFile) ; }
catch
(IOException e) {
System.out.println("public
jButtonFileNameMouseClicked::imgIo.read IOException");
ioflag=1;
}
if(ioflag == 0)
{
System.out.println("file
width=" + buffImg.getWidth()
+"
length=" + buffImg.getHeight() );
//why
not draw a line on the image
Graphics
gg = buffImg.createGraphics();
gg.setColor(Color.MAGENTA);
gg.drawLine(10,10,buffImg.getWidth()-buffImg.getWidth()/10,
buffImg.getHeight()-buffImg.getHeight()/2);
//save
the file after drawing the line on it
File outfile = new File("imgs/out.jpg");
try {ImageIO.write(buffImg,"JPG",outfile); }
catch
(IOException e) {
System.out.println("jButtonFileNameMouseClicked::"
+"outfilewrite
IOException");
}
//examples
of reading and writing pixel data
int rgb =0;
int alpha=0 , red=0 , green=0 , blue=0;
int a=255 , r=0 , g=200 , b=0;
int xx=20;
for(int
yy=0; yy<30; yy++) //read and write some pixels
{
rgb
= buffImg.getRGB(xx, yy) ; //read pixel
alpha
= ((rgb >> 24) & 0xff);
red
= ((rgb >> 16) & 0xff);
green
= ((rgb >> 8) & 0xff);
blue
= ((rgb ) & 0xff);
System.out.println("yy="+
yy +" pix=" + buffImg.getRGB(xx, yy)
+
" red=" + red + " green=" + green + " blue=" + blue
+"
alpha=" +alpha
);
//change
the pixels to green
a=255;
r=0; g=200; b=0;
rgb
= (a << 24) | (r << 16) | (g << 8) | b;
buffImg.setRGB(xx,
yy, rgb); //write pixel
}
imageIcon=new
ImageIcon(buffImg);
iconLabel.setIcon(imageIcon);
iconLabel
= new JLabel(imageIcon);
imagepanel.removeAll();
imagepanel.add(iconLabel,0);
imagepanel.setBackground(Color.YELLOW);
jScrollPaneImageArea.setBackground(Color.BLUE);
imagepanel.revalidate();
imagepanel.repaint();
imagepanel.setAutoscrolls(true);
//allows dragging?
}
}
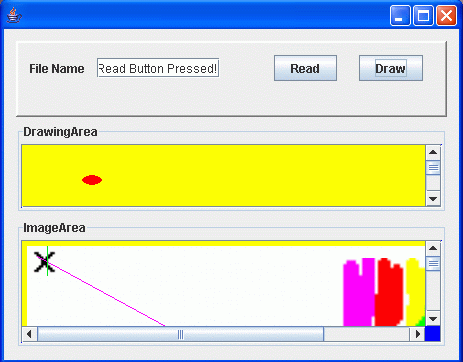
Build and run the program. Press rhe read and draw buttons,
and if all goes well, you shoud observe an output as follows:
Above:
adding
inner class for image area, InnerClassImagePanel.
Also, the program should have created a new image file
"imgs/out.jpg" that has the magenta line drawn across the original
image file "imgs/image512x512.gif." Use another image viewer
tool to see that the original file does not have the magenta
line. The green line appears because of the
pixel-writing that occurs at the bottom of the pixel-reading loop
in the In the
jButtonFileNameMouseClicked(java.awt.event.MouseEvent evt) method
above. Because the file is writtten before the green line is
drawn, "out.jpg" will not contain the green line.
Sometimes you may encounter graphics color map problems, if you
try to read a file with a color table, and then write to it. To
avoid such problems, you may need to allocate a buffer as
follows:
When the read button is clicked, the OutputPane at the bottom of
NetBeans contains the printeout of the pixel data from the
pixel-reading loop. The output should appear something like
the following:
yy=25 pix=-196868 red=252
green=254 blue=252 alpha=255
yy=26 pix=-196868 red=252 green=254 blue=252 alpha=255
yy=27 pix=-592900 red=246 green=243 blue=252 alpha=255
yy=28 pix=-196868 red=252 green=254 blue=252 alpha=255
yy=29 pix=-196868 red=252 green=254 blue=252 alpha=255
In the jButtonFileNameMouseClicked(java.awt.event.MouseEvent evt)
method above, also try commenting out the line "imgFileName=new
String("imgs/image512x512.gif");" and rebuilding the
program. In this case, you will now have to enter the file
name "imgs/image512x512.gif" in the window text area for the file
to be loaded.
The entire project up to this point may be downloaded as
ecgr6118a_4.zip or as a
tar-file
ecgr6118a_4.tar for
convenience.
Another example Java project using Java/Netbeans-4.1 is available
on :
imgProjv41 or
tpwJavaNtebeansTutorial/imgProjv41/
Note: if the windows-click-and-run
is installed incorrectly, you will need to open a command-prompt
window and
type "java -jar myjarfile.jar"
to run myjarfile.jar. The jar files are most commonly in
the "dist" subdirectories of Netbeans projects. Or, you may
just run your application from within Netbeans.
Compiling to other target Java
Virtual Machines:
Unfortunately,
this
does not work: you will get error: javac: source release 1.5
requires target release 1.5
BUILD FAILED
On occasion, the project may not run on a machine that is
running an older version of Java. You may get error messages
such as "Unsupported major.minor version 49.0." You can
check the version of Java on the machine with the "java -version"
command. This tutorial used version 1.5 of Java. To
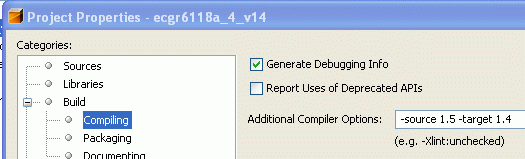
compile your project for an older machine, use compiler options
"-source 1.5 -target 1.4" or similar. To set these compile
options, right-click your project in the ProjectPane in NetBeans
and select properties and edit as shown below. The v1.4
version of the project is
ecgr6118a_4_v14.zip
or as a tar-file
ecgr6118a_4_v14.tar
Unfortunately, this does not
work: you will get error: javac: source release 1.5 requires
target release 1.5
BUILD FAILED
References:
NetBeans/Java Installation notes:
The above tutorial was written for
NetBeans 5.5 Beta 2, and tested on a system with the following
installed items :
NetBeans IDE 5.5 Beta 2 Installer:
netbeans-5_5-beta2-windows.exe (42.1 MB)
NetBeans Mobility 5.5 Beta 2 Installer:
netbeans_mobility-5_5-beta2-win.exe (22.49 MB)
NetBeans Profiler 5.5 Beta 2 Installer:
profiler-5_5-beta2-win.exe (9.06 MB)
NetBeans C/C++ Pack 5.5 EA Installer: cnd-060615-windows.exe
(7.49 MB)
Java is a trademark of Sun Microsystems, Inc.
NetBeans is a trademark or
registered trademark of Sun Microsystems, Inc.